Control Properties
Each Control has a set of Properties which allow you to configure the appearance and behaviour of the Control. Some Properties can be accessed directly within your Scripts wherever you can use a variable.
Properties are specified using the following case-insensitive format:
ControlName.Property
e.g.: FullName.width = FirstName.width + Surname.width
In this example, setting the width of the FullName Control will immediately change the width of the Control displayed on the device.
You can also use this format within an IF statement or as a parameter to a Method, e.g.:
If FirstName.text = "Ann" Then
Dim Name = "Hello " & FirstName.text
MsgBox(Name,"info")
Else
MsgBox(FirstName.text)
End If
If you prefer, you can store the Control's name within a variable and use that in place of the Control's name:
Dim Controlname = "FullName"
Controlname.width = 20
In addition, you can use the shortcut 'Me' to refer to the Control which is running the Script instead of having to use the Control's name. For example, suppose you have a Script assigned to a button's OnClick Event and when that button is clicked you want the button's label to change from 'Add' to 'Edit'. You could do this within the Script which runs from the OnClick Event by using the text Property as follows:
Me.text = "Edit"
Similarly, when a timer control's OnTimer Event is raised, you could disable the calling timer from a Script assigned to the OnTimer Event, by including the following code:
Me.enabled = "False"
The following Properties can be accessed directly in your Scripts:
Property
Availability
Description
bottom
All Controls
Y coordinate in pixels, or on Android devices in Device Independent Pixels (DIP), for the bottom edge of the Control. Read-only.
Enabled
All Controls, except Static Text
Value indicating whether the Control is enabled ("True" or "False").
Height
All Controls
Height of the Control in pixels, or on Android devices in Device Independent Pixels (DIP).
Note that with Check Box and Radio Button Controls, the height of the Control doesn't affect the size of the check box or radio button itself. With Slider Controls on Apple and Windows Desktop Platforms, you can also change the height of the overall control, but the height of the slider itself remains unchanged.
left
All Controls
X coordinate in pixels, or on Android devices in Device Independent Pixels (DIP), for the left edge of the Control.
Max
Progress Control, Slider Control and Edit Control with spinner enabled
Maximum numeric value.
Edit Control without spinner enabled
Maximum number of characters. Set to 0 (zero) for no restriction.
min
Progress Control, Slider Control and Edit Control with spinner enabled
Minimum numeric value.
readonly
Edit Control with or without spinner enabled
Specifies whether the Control is read-only:
"True"
read-only, you cannot change the value of the edit box (edit box becomes read-only but spinner control, if present is unaffected).
"False"
not read-only, characters can be entered into the edit box from the keypad.
right
All Controls
X coordinate in pixels, or on Android devices in Device Independent Pixels (DIP), for the right edge of the Control. Read-only.
stepvalue
Edit Control with spinner enabled
The amount by which the currently displayed value increases or decreases when one of the spinner buttons is clicked or tapped.
Text
All Controls which can display text except List Box and ListView Controls.
Not relevant to Timer, Panel and Group Controls.
String representing the text displayed in the Control. Note that this might not be the same as the actual value stored in the Control and which would be returned by the GetControlValue Scripting Method, e.g. when using a Date Picker Control where the displayed value may differ from the actual value depending upon the value of the Format Property of the Control.
For Date Picker Controls the value can be specified using any of the formats available to input values using the SetControlValue Scripting Method.
top
All Controls
Y coordinate in pixels, or on Android devices in Device Independent Pixels (DIP), for the top edge of the Control.
value
All Controls except Panel Controls
This Property contains the value of the Control.
Accessing this property directly is similar to using the GetControlValue and SetControlValue Scripting Methods.
visible
All Controls
Value indicating the visibility of the Control ("True" or "False").
width
All Controls
Width of the Control in pixels, or on Android devices in Device Independent Pixels (DIP).
On Android devices there is a potential issue when upgrading from an earlier version of Digitise Apps' predecessor MX, whereby Control Properties could contain incorrect values after the upgrade. This could mean that Controls will be incorrectly positioned on the screen or interrogating the values of Properties, such as right and left, will report an incorrect value. It could also affect the values returned by the GetSystemInfo Scripting Method when requesting the height or width of the screen.
In Digitise Apps, control positioning moved to using device independent pixels (DIP) rather than pixels, which might result in Control Properties and screen height and width sizes containing different values than under previous versions of MX, resulting in Controls being incorrectly positioned or reporting their position on the screen wrongly. For backward compatibility, an option is provided to retain the previous behaviour so that the Controls will return to working as before, so you don't have to reposition them or adjust your Scripts to take account of the new values in affected Properties.
To retain the original behaviour:
-
Open your Project in App Studio.
-
Click on the top node in the Forms, Data Sources or Resources Panes to display the Application Properties in the Properties Pane.
-
Under the Events category, find the OnLoad Event and double-click on it to open the Application Script window in the Workspace.
-
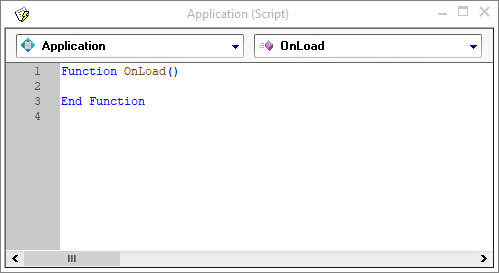
The Script window will display the current contents of the OnLoad Script. If the Script hasn't previously been edited, the window will look like this:

If this Script has been edited previously, you will see the Script code displayed between the Function OnLoad and End Function lines.
-
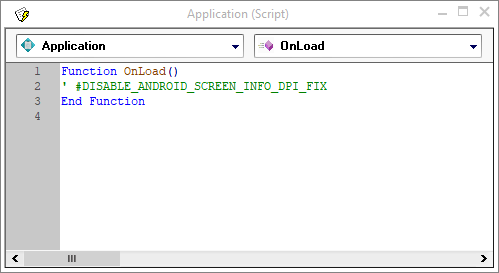
To retain the original behaviour, you need to insert the following line immediately after the Function OnLoad line:
' #DISABLE ANDROID_SCREEN_INFO_DPI_FIX
If the Script hasn't otherwise been edited, it will now look like this:

-
You will need to save your Project, republish it and redeploy the app to your users. Your app will now continue to work as it did in the earlier version of MX.